Resizing Program Windows for a Perfect Fit on your Computer Screens
Resizing
program windows is simple once you’ve learned a few easy steps. This tutorial will guide you through these
steps.
General Information
To
allow you full control of your window screen, let’s label the various parts to
a window.

|
Title Bar |
Gives
the name of the program, and often the name of the file it is working
with. You can move a
window around by dragging the Title
bar. |
|
Close Button |
Closes the window. |
|
Minimize Button |
Hides the window, with a button
available on the taskbar for easy access. |
|
Maximize/Reduce Button |
Changes the windows size, so it
either fills the screen or becomes “sizeable”. |
|
Tools |
A list of buttons to help you
navigate around your computer and change the way you view files. |
__________________________________________________________________________________
Windows are resizable and easily movable. Let’s take a look at how to do this.

When you first open a program, it
usually takes up the whole screen unless you adjust the size by using these
tools. When you use the minimize
button, the program is reduced to a button on the taskbar at the very bottom of your screen,
however, the maximize/reduce button will allow you the ability to re-size your
program window instead of reducing it to the bottom on the taskbar. NOTE: All
four corners act the same and allow full resizing by dragging them out or
in.
__________________________________________________________________________________
When the program is in “Maximized” view, the
Maximize/Reduce button looks like this.

__________________________________________________________________________________
When the program is in “Reduced” view, the Maximize/Reduce
button looks like this.

__________________________________________________________________________________
Now let’s go through the steps to organize Ancestral Quest
and familysearch.org as illustrated here.

__________________________________________________________________________________
Step 1) With your Ancestral Quest program open and taking up your
whole screen click on the “Maximize/Reduce” button with your left mouse button
to change the program into a “reduced”, or “sizeable” mode.

__________________________________________________________________________________
Step 2) Place the cursor in the “Title Bar” and while holding down
the left mouse button, drag the whole window to the upper right corner of your
screen.
Note that the screen may
still be large, but it is not taking up the whole screen.
__________________________________________________________________________________
Step 3) This window needs to be a little shorter and a little
narrower. To do this use the side
borders or the corners.

You can move them any way you wish with your mouse and the
left button held down. Adjust it till
you feel comfortable with the size and view.
The object here is to place your program so that you can
see it comfortably, allowing you to continue to do your research on the IGI.
__________________________________________________________________________________
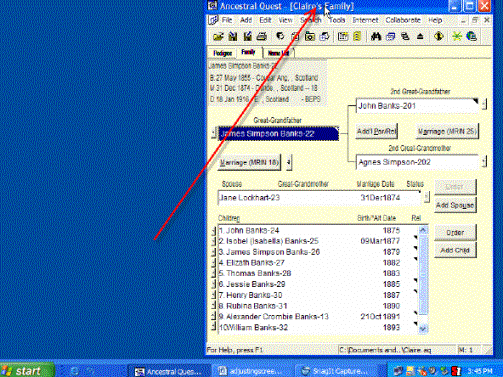
Step 4) Determine
which kind of event you want to search for: an individual, a marriage or
children from a marriage. As you look in your family files in
Ancestral Quest, make your selection.
Use the “Pedigree”, “Family” or
the “Name List” views. For the purpose
of this tutorial, we will search from the “Family View” screen. Now locate the
individual you wish to search for. In
the example below, we selected “Thomas Banks.”
(RIN 1048).

__________________________________________________________________________________
Step 5) Double Click that
individual to bring up the “Edit Individual” view. (Depending on your
preference settings, you may need to right-click on the individual’s name, then
select “Edit Individual” instead of double-clicking.)

__________________________________________________________________________________
Step 6) Click on the “Sign On to IGI”, the following familysearch.org window
opens up.

__________________________________________________________________________________
Step 7) Click the “Maximize/Reduce” button. This will reduce the size of this window
enough to allow you to move it around.

At this point you can take the time to “Sign On” bringing
in the next window for the website.
This step was covered in the Individual
Search Guide
__________________________________________________________________________________
Step 8) Place your cursor in the “Title Bar” and hold your left mouse button down and move it to the left as far as you can. Then move the right border to the left like this.

Once
you have finished resizing your screen should look like this. The arrow is pointing to the new position of
the familysearch.org right border.
__________________________________________________________________________________
Congratulations!
Your windows are all resized and you are ready to “Search the IGI” by
clicking that button. This will bring
in the search results from your chosen search.
Click here to go back to the Individual
Search.
Once you have done this a few times, it will become very
easy to work with multiple windows.
©Incline Software, LC
This
Search guide may be copied for noncommercial purposes, class studies and personal
use of the many genealogical groups worldwide.